다른 하나는 사용자 영역에 있는 프로세스의 가상 메모리 관리를 위한 것으로 vm_area_struct입니다.
커
널 내부에서의 가상 메모리는 vmlist 전역 변수가 head이기 때문에 vmlist를 따라 struct vm_struct
*next 멤버를 따라가면서 탐색하면 됩니다.(동기화를 위해 vmlist_lock 전역 변수가 선언되어 있습니다.
DEFINE_RWLOCK( vmlist_lock ); 그러니, 접근이나 수정시에는 적절한 잠금을 사용하시길...)
프로세스의 가상 메모리는 프로세스의 메모리를 관리하는 mm_struct 구조체의 mmap 멤버가 head이며, 여기서 시작해서 vm_area_struct 구조체의 vm_next 멤버를 따라가면서 탐색하면 됩니다.
이 둘을 위한 API가 전부 따로 있는데, 이름 때문에 혼동되는 부분이 꽤 있습니다.
게
다가, 커널 공간에서의 가상 메모리 할당에는 vmap(), vunmap()이 사용되고, 프로세스의 가상 메모리 할당에는
vmalloc(), vfree()가 사용되는데, 내부적으로는 get_vm_area() 함수에 의해 메모리가 할당되고, 흩어진
물리 메모리를 연속된 물리 메모리로 매핑하는 map_vm_area() 함수를 공통으로 사용하고 있습니다.
여기까지의 내용은 커널 2.6.14.6을 기준으로 한 이야기이고, 커널 2.6.20을 보면 내부가 상당히 바뀌었습니다.
vmap() 함수의 구현은 그다지 바뀌지 않았고, vmalloc() 함수는 내부 처리가 __vmalloc_node()으로 바뀌었군요.
NUMA를 위해 뭔가 세부 처리를 더한 것 같은데, NUMA 시스템을 사용하지 않으니 모르겠습니다. :)
유닉스와 같은 멀티태스킹운영체제에서 데몬(daemon,
발음: 데이먼/'deɪmən/ 또는 디먼 /'dimən/[1])은 사용자가 직접적으로 제어하지 않고, 백그라운드에서 돌면서 여러 작업을 하는
프로그램을 말한다. 시스템 로그를 남기는 syslogd처럼 보통 데몬을 뜻하는 ‘d’를 이름 끝에 달고 있으며, 일반적으로
프로세스로 실행된다.
데몬은 대개 부모 프로세스를 갖지 않으며, 즉 PPID가 0이며, 따라서 프로세스 트리에서 init 바로 아래에 위치한다. 데몬이 되는
방법은 일반적으로 자식 프로세스를 포크(fork)하여
생성하고 자식을 분기한 자신을 죽이면서 init이 고아가 된 자식 프로세스를 자기 밑으로 데려가도록 하는 방식이다. 이러한 방법을 ‘fork
off and die’라 부르기도 한다.
시스템은 시동할 때 데몬을 시작하는 경우가 많으며, 이런 데몬들은 네트워크 요청, 하드웨어 동작, 여타 프로그램에 반응하는 기능을 담당하게
된다. 그 밖에도 몇몇 리눅스에 있는
devfsd처럼 하드웨어 설정이나, cron처럼 주기적인 작업을 실행하는 등 기타 다양한 목적으로 사용된다.
데몬 프로세스 생성 방법
기술적으로 엄밀히 말하자면, 유닉스에서 부모 프로세스가 PID 1(init)이고 제어하는
터미널이 없을 때 그 프로세스를 데몬이라 할 수 있다. 부모 프로세스가 종료되면 init 프로세스가 그 프로세스를 받아 들인다. 데몬을 만들려면
보통 다음과 같은 과정이 필요하다.
마이크로소프트 도스 환경에서 이러한 프로그램은 램
상주 프로그램(TSR)의 형태를 취했다. 마이크로소프트
윈도에서는 데몬과 같은 역할을 하는 프로그램을 서비스라고 부르지만,
유닉스 계열의 영향을 받아 데몬이라고 부르는 경우도 있다. 클래식 맥 오에스에서는 이러한 프로그램을 시스템
확장이라 불렀으며, 유닉스 계열 운영 체제인 맥 오에스 텐에서는 데몬이
존재한다. (서비스도
존재하긴 하지만 전혀 다른 개념이다.)
A daemon process is usually defined as a background process
that does not belong to a terminal session. Many system services are
performed by daemons; network services, printing etc.
Simply invoking a program in the background isn't really adequate for
these long-running programs; that does not correctly detach the process from
the terminal session that started it. Also, the conventional way of starting
daemons is simply to issue the command manually or from an rc script; the
daemon is expected to put itself into the background.
Here are the steps to become a daemon:
fork() so the parent can exit, this returns control to
the command line or shell invoking your program. This step is required so
that the new process is guaranteed not to be a process group leader. The
next step, setsid(), fails if you're a process group leader.
setsid() to become a process group and session group
leader. Since a controlling terminal is associated with a session, and
this new session has not yet acquired a controlling terminal our process
now has no controlling terminal, which is a Good Thing for daemons.
fork() again so the parent, (the session group leader),
can exit. This means that we, as a non-session group leader, can never
regain a controlling terminal.
chdir("/") to ensure that our process doesn't keep any
directory in use. Failure to do this could make it so that an administrator
couldn't unmount a filesystem, because it was our current directory.
[Equivalently, we could change to any directory containing files
important to the daemon's operation.]
umask(0) so that we have complete control over the
permissions of anything we write. We don't know what umask we may have
inherited.
[This step is optional]
close() fds 0, 1, and 2. This releases the standard in,
out, and error we inherited from our parent process. We have no way of
knowing where these fds might have been redirected to. Note that many
daemons use sysconf() to determine the limit
_SC_OPEN_MAX. _SC_OPEN_MAX tells you the maximun
open files/process. Then in a loop, the daemon can close all possible file
descriptors. You have to decide if you need to do this or not. If you think
that there might be file-descriptors open you should close them, since
there's a limit on number of concurrent file descriptors.
Establish new open descriptors for stdin, stdout and stderr. Even if
you don't plan to use them, it is still a good idea to have them open. The
precise handling of these is a matter of taste; if you have a logfile,
for example, you might wish to open it as stdout or stderr, and open
`/dev/null' as stdin; alternatively, you could open
`/dev/console' as stderr and/or stdout, and `/dev/null' as
stdin, or any other combination that makes sense for your particular
daemon.
Almost none of this is necessary (or advisable) if your daemon is being
started by inetd. In that case, stdin, stdout and stderr are
all set up for you to refer to the network connection, and the
fork()s and session manipulation should not be done
(to avoid confusing inetd). Only the chdir() and
umask() steps remain as useful.
block trace 란 리눅스에서 Disk I/O 가 일어날때, linux 하위 level 에서 어떻게 Block 단위의 I/O 가 일어났는지 알아낼수 있는 Tool DB 접근에서 주로 DB recovery 나 join 시의 DIsk I/O 패턴을 알아내는데 유용하다.
3. seekwatcher 압출을 풀면 seekwatcher 란 실행파일이 생성 됨 이 파일을 /usr/bin 에 복사후 사용
blktrace 실행
1. mkdir /trace 2. blktrace -d /dev/target_device 3. cd /trace 에 device_name.blktrace 파일이 생성 된다.
seekwatcher 실행
seekwatcher -t trace파일
exception
/usr/lib/python2.6/site-packages/matplotlib/rcsetup.py:117: UserWarning: rcParams key "numerix" is obsolete and has no effect; please delete it from your matplotlibrc file warnings.warn('rcParams key "numerix" is obsolete and has no effect;\n'
GCC
provides a large number of built-in functions other than the ones
mentioned above. Some of these are for internal use in the processing
of exceptions or variable-length argument lists and will not be
documented here because they may change from time to time; we do not
recommend general use of these functions.
The remaining functions are provided for optimization purposes.
GCC includes built-in versions of many of the functions in the standard C library. The versions prefixed with __builtin_ will always be treated as having the same meaning as the C library function even if you specify the -fno-builtin option. (see C Dialect Options)
Many of these functions are only optimized in certain cases; if they
are not optimized in a particular case, a call to the library function
will be emitted.
Outside strict ISO C mode (-ansi, -std=c89 or -std=c99), the functions _exit, alloca, bcmp, bzero, dcgettext, dgettext, dremf, dreml, drem, exp10f, exp10l, exp10, ffsll, ffsl, ffs, fprintf_unlocked, fputs_unlocked, gammaf,gammal, gamma, gammaf_r, gammal_r, gamma_r, gettext, index, isascii, j0f, j0l, j0, j1f, j1l, j1, jnf, jnl, jn, lgammaf_r, lgammal_r, lgamma_r, mempcpy, pow10f, pow10l, pow10, printf_unlocked, rindex, scalbf, scalbl, scalb,signbit, signbitf, signbitl, signbitd32, signbitd64, signbitd128, significandf, significandl, significand, sincosf, sincosl, sincos, stpcpy, stpncpy, strcasecmp, strdup, strfmon, strncasecmp, strndup, toascii, y0f, y0l, y0, y1f, y1l, y1, ynf,ynl and yn may be handled as built-in functions. All these functions have corresponding versions prefixed with __builtin_, which may be used even in strict C89 mode.
There are also built-in versions of the ISO C99 functions acosf, acosl, asinf, asinl, atan2f, atan2l, atanf, atanl, ceilf, ceill, cosf, coshf, coshl, cosl, expf, expl, fabsf, fabsl, floorf, floorl, fmodf, fmodl, frexpf, frexpl, ldexpf,ldexpl, log10f, log10l, logf, logl, modfl, modf, powf, powl, sinf, sinhf, sinhl, sinl, sqrtf, sqrtl, tanf, tanhf, tanhl and tanl that
are recognized in any mode since ISO C90 reserves these names for the
purpose to which ISO C99 puts them. All these functions have
corresponding versions prefixed with __builtin_.
The ISO C94 functions iswalnum, iswalpha, iswcntrl, iswdigit, iswgraph, iswlower, iswprint, iswpunct, iswspace, iswupper, iswxdigit, towlower and towupper are handled as built-in functions except in strict ISO C90 mode (-ansi or -std=c89).
The ISO C90 functions abort, abs, acos, asin, atan2, atan, calloc, ceil, cosh, cos, exit, exp, fabs, floor, fmod, fprintf, fputs, frexp, fscanf, isalnum, isalpha, iscntrl, isdigit, isgraph, islower, isprint, ispunct, isspace, isupper,isxdigit, tolower, toupper, labs, ldexp, log10, log, malloc, memchr, memcmp, memcpy, memset, modf, pow, printf, putchar, puts, scanf, sinh, sin, snprintf, sprintf, sqrt, sscanf, strcat, strchr, strcmp, strcpy, strcspn, strlen, strncat,strncmp, strncpy, strpbrk, strrchr, strspn, strstr, tanh, tan, vfprintf, vprintf and vsprintf are all recognized as built-in functions unless -fno-builtin is specified (or -fno-builtin-function is specified for an individual function). All of these functions have corresponding versions prefixed with __builtin_.
GCC
provides built-in versions of the ISO C99 floating point comparison
macros that avoid raising exceptions for unordered operands. They have
the same names as the standard macros (isgreater, isgreaterequal, isless, islessequal, islessgreater, and isunordered) , with __builtin_ prefixed. We intend for a library implementor to be able to simply #define each standard macro to its built-in equivalent. In the same fashion, GCC provides isfinite and isnormal built-ins used with __builtin_ prefixed.
— Built-in Function: int __builtin_types_compatible_p (type1, type2)
You can use the built-in function __builtin_types_compatible_p to determine whether two types are the same.
This built-in function returns 1 if the unqualified versions of the types type1 and type2 (which
are types, not expressions) are compatible, 0 otherwise. The result of
this built-in function can be used in integer constant expressions.
This built-in function ignores top level qualifiers (e.g., const, volatile). For example, int is equivalent to const int.
The type int[] and int[5] are compatible. On the other hand, int and char * are
not compatible, even if the size of their types, on the particular
architecture are the same. Also, the amount of pointer indirection is
taken into account when determining similarity. Consequently, short * is not similar to short **. Furthermore, two types that are typedefed are considered compatible if their underlying types are compatible.
An enum type is not considered to be compatible with another enum type even if both are compatible with the same integer type; this is what the C standard specifies. For example,enum {foo, bar} is not similar to enum {hot, dog}.
You would typically use this function in code whose execution varies depending on the arguments' types. For example:
You can use the built-in function __builtin_choose_expr to evaluate code depending on the value of a constant expression. This built-in function returns exp1 if const_exp, which is a constant expression that must be able to be determined at compile time, is nonzero. Otherwise it returns 0.
This built-in function is analogous to the `? :'
operator in C, except that the expression returned has its type
unaltered by promotion rules. Also, the built-in function does not
evaluate the expression that was not chosen. For example, if const_exp evaluates to true, exp2 is not evaluated even if it has side-effects.
This built-in function can return an lvalue if the chosen argument is an lvalue.
If exp1 is returned, the return type is the same as exp1's type. Similarly, if exp2 is returned, its return type is the same as exp2.
Example:
          #define foo(x)                                                    \
            __builtin_choose_expr (                                         \
              __builtin_types_compatible_p (typeof (x), double),            \
              foo_double (x),                                               \
              __builtin_choose_expr (                                       \
                __builtin_types_compatible_p (typeof (x), float),           \
                foo_float (x),                                              \
                /* The void expression results in a compile-time error  \
                   when assigning the result to something.  */          \
                (void)0))
Note: This construct is only available for C. Furthermore, the unused expression (exp1 or exp2 depending on the value of const_exp) may still generate syntax errors. This may change in future revisions.
— Built-in Function: int __builtin_constant_p (exp)
You can use the built-in function __builtin_constant_p to
determine if a value is known to be constant at compile-time and hence
that GCC can perform constant-folding on expressions involving that
value. The argument of the function is the value to test. The function
returns the integer 1 if the argument is known to be a compile-time
constant and 0 if it is not known to be a compile-time constant. A
return of 0 does not indicate that the value is not a constant, but merely that GCC cannot prove it is a constant with the specified value of the -O option.
You would typically use this function in an embedded application
where memory was a critical resource. If you have some complex
calculation, you may want it to be folded if it involves constants, but
need to call a function if it does not. For example:
You
may use this built-in function in either a macro or an inline function.
However, if you use it in an inlined function and pass an argument of
the function as the argument to the built-in, GCC will never return 1
when you call the inline function with a string constant or compound
literal (see Compound Literals) and will not return 1 when you pass a constant numeric value to the inline function unless you specify the -O option.
You may also use __builtin_constant_p in initializers for static data. For instance, you can write
This is an acceptable initializer even if EXPRESSION is
not a constant expression. GCC must be more conservative about
evaluating the built-in in this case, because it has no opportunity to
perform optimization.
Previous versions of GCC did not accept this built-in in data
initializers. The earliest version where it is completely safe is 3.0.1.
— Built-in Function: long __builtin_expect (long exp, long c)
You may use __builtin_expect to
provide the compiler with branch prediction information. In general,
you should prefer to use actual profile feedback for this (-fprofile-arcs),
as programmers are notoriously bad at predicting how their programs
actually perform. However, there are applications in which this data is
hard to collect.
The return value is the value of exp, which should be an integral expression. The semantics of the built-in are that it is expected that exp == c. For example:
          if (__builtin_expect (x, 0))
            foo ();
would indicate that we do not expect to call foo, since we expect x to be zero. Since you are limited to integral expressions for exp, you should use constructions such as
          if (__builtin_expect (ptr != NULL, 1))
            error ();
when testing pointer or floating-point values.
— Built-in Function: void __builtin_trap (void)
This function causes the program to exit abnormally. GCC
implements this function by using a target-dependent mechanism (such as
intentionally executing an illegal instruction) or by calling abort. The mechanism used may vary from release to release so you should not rely on any particular implementation.
This function is used to flush the processor's instruction cache for the region of memory between begin inclusive and end exclusive.
Some targets require that the instruction cache be flushed, after
modifying memory containing code, in order to obtain deterministic
behavior.
If the target does not require instruction cache flushes, __builtin___clear_cache has no effect. Otherwise either instructions are emitted in-line to clear the instruction cache or a call to the __clear_cache function in libgcc is made.
This function is used to minimize cache-miss latency by moving data into a cache before it is accessed. You can insert calls to __builtin_prefetch into
code for which you know addresses of data in memory that is likely to
be accessed soon. If the target supports them, data prefetch
instructions will be generated. If the prefetch is done early enough
before the access then the data will be in the cache by the time it is
accessed.
The value of addr is the address of the memory to prefetch. There are two optional arguments, rw and locality. The value of rw is
a compile-time constant one or zero; one means that the prefetch is
preparing for a write to the memory address and zero, the default,
means that the prefetch is preparing for a read. The value locality must
be a compile-time constant integer between zero and three. A value of
zero means that the data has no temporal locality, so it need not be
left in the cache after the access. A value of three means that the
data has a high degree of temporal locality and should be left in all
levels of cache possible. Values of one and two mean, respectively, a
low or moderate degree of temporal locality. The default is three.
          for (i = 0; i < n; i++)
            {
              a[i] = a[i] + b[i];
              __builtin_prefetch (&a[i+j], 1, 1);
              __builtin_prefetch (&b[i+j], 0, 1);
              /* ... */
            }
Data prefetch does not generate faults if addr is invalid, but the address expression itself must be valid. For example, a prefetch of p->next will not fault if p->next is not a valid address, but evaluation will fault if p is not a valid address.
If the target does not support data prefetch, the address expression
is evaluated if it includes side effects but no other code is generated
and GCC does not issue a warning.
Returns a positive infinity, if supported by the floating-point format, else DBL_MAX. This function is suitable for implementing the ISO C macro HUGE_VAL.
This is an implementation of the ISO C99 function nan.
Since ISO C99 defines this function in terms of strtod, which we do not implement, a description of the parsing is in order. The string is parsed as by strtol; that is, the base is recognized by leading `0' or `0x'
prefixes. The number parsed is placed in the significand such that the
least significant bit of the number is at the least significant bit of
the significand. The number is truncated to fit the significand field
provided. The significand is forced to be a quiet NaN.
This function, if given a string literal all of which would have
been consumed by strtol, is evaluated early enough that it is
considered a compile-time constant.
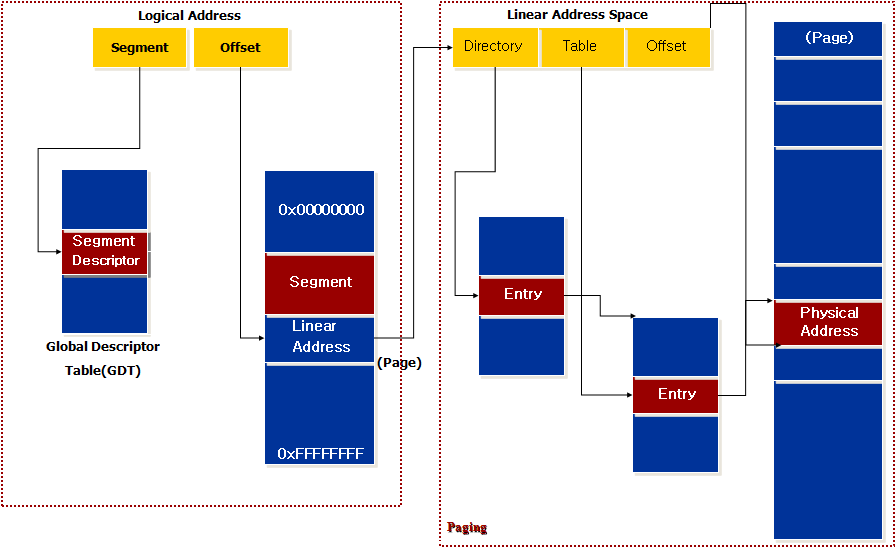
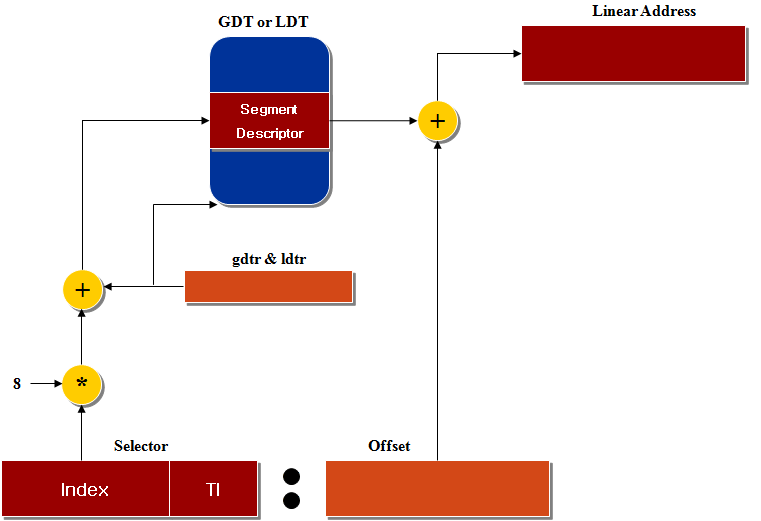
위에 그림을 보시면 먼저 세그먼트로 나누어져 있는 메모리에 세그먼트 식별자와 오프셋값을 이용하여 찾아가면 해당
데이터의 선형 주소가 있고 그 선형 주소를 이용하여 페이징 되어 있는 메모리를 찾아가면 물리 주소가 있습니다.
리눅스에서의 세그먼테이션
세그먼테이션은 각 프로세스에 다른 선형 주소 공간을 할당하는 메모리 관리 기법입니다.
리눅스에서는 메모리 관리를 좀 더 간단하고 다른 대중적인 아키텍처와 호환하기 위해서 세그먼테이션을 매우 제한적으로 지원합니다.
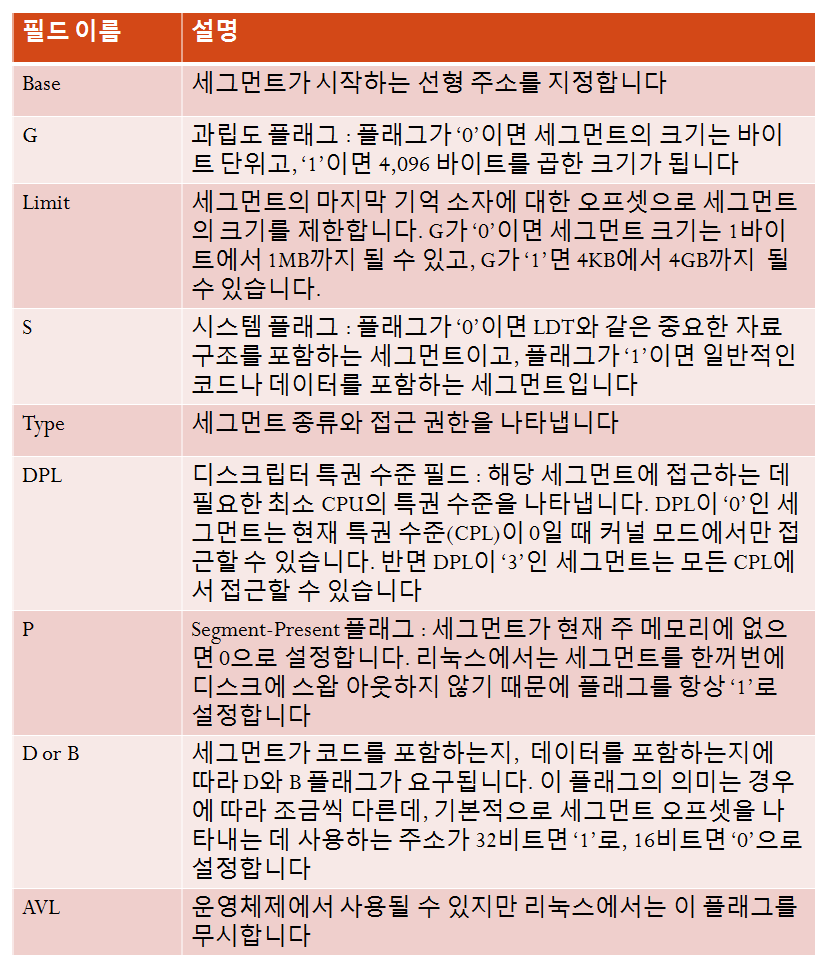
세그먼트 디스크립터는 세그먼트 특징을 기술하는 8바이트 크기의 데이터입니다.
세그먼트 디스크립터는 GDT(Global Descriptor Table)이나 LDT(Local Descriptor Talbe)에
저장 되는데, GDT는 보통 하나만 정의하지만 LDT는 필요한 만큼 정의해서 사용할수 있습니다. GDT가 위치한 주소는 gdtr
프로세서 레지스터에, LDT는 lgtr 프로세서 레지스터에 들어가 있습니다.
[세그먼트 디스크립터 필드들]
이러한 세그먼테이션 디스크립터를 이용하여 세그먼테이션 유닛이 논리 주소를 선형 주소로 변환합니다.
세그먼테이션 유닛은 세그먼테이션를 처리하기 위한 하드웨어 적인 회로로써 다음과 같은 작업을 수행합니다.
1. 세그먼트 셀렉터의 TI 필드를 검사해서 세그먼트 디스크립터가 어떤 디스크립터 테이블에 들어 있는지 확인합니다. TI 필드는 디스크립터가 있는 위치를 나타내는 필드입니다.
2. 세그먼트 셀렉터의 index 필드로 세그먼트 디스크립터의 주소를 계산합니다. 즉 index 필드에 세그먼트 디스크립터의 크기를 곱한 값을 gdtr이나 ldtr의 레지스터 내용에 더합니다.
3. 세그먼트 디스크립터의 Base 필드에 논리 주소의 오프셋을 더하여 선형 주소를 얻게 됩니다.
[세그먼트 논리 주소 변환 과정]
또한 세그먼트 디스크립터로의 빠른 접근하기 위해서 80x86프로세서는 논리 주소를 선형 주소로 빠르게 변형하기 위하여 프로그래밍이 가능한 여섯개의 세그먼테이션 레지스터에 각각 프로그램이 불가능한 레지스터를 추가로 제공합니다.
세그먼트 셀렉터를 세그먼테이션 레지스터로 로딩할때마다 이 프로그래밍이 불가능한 레지스터에 세그먼트 디스크립터를 저장하여 프로세서가 GDT나 LDT에 접근하지 않고 바로 세그먼트에 접근 할 수 있도록 해줍니다.
리눅스에서의 페이징
페이징은 선형주소를 '페이지'라는 고정된 크기로 나누는 메모리 관리 기법입니다.
한 페이지에 있는 연속된 선형 주소는 연속된 물리 주소로 매핑되어 커널은 모든 선형 주소마다 물리 주소와 접근 권한을 지정하는 것이 아니라 페이지 단위로 지정합니다.
페이징 유닛은 램의 모든 영역이 '페이지 프레임'이라는 고정된 길이로 나뉘어져 있다고 생각하며, 각 페이지 프레임마다 페이지가 하나씩 들어가는 식으로 메모리를 관리합니다.
일반적으로 80x86에서는 4KB 크기의 페이지를 사용합니다.
선형 주소 변환은 '페이지 디렉토리'라고 하는 변환 테이블을 사용하는 단계와 '페이지 테이블'을 사용하는 단계로 이루어집니다.
이렇게 두 단계로 나누어 변환하는 이유는 프로세스마다 필요한 페이지 테이블이 램에서 차지하는 크기를 줄이기 때문입니다.
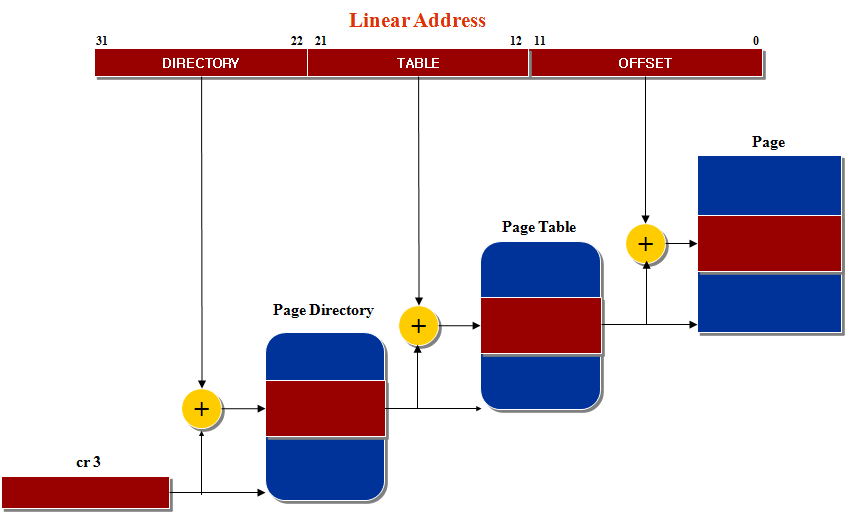
[일반적인 80x86 프로세서의 페이징]
제어 레지스터 cr3에는 현재 사용 중인 페이지 디렉토리의 물리 주소가 들어 있습니다. 이를 좀 더 자세히 살펴 보겠습니다.
커널이 어떤 프로세스에 0x20000000에서 0x2003ffff까지 선형 주소를 할당하였고 0x20021406에 있는 값을 가져오려고 하겠습니다.
1. 먼저 페이징 유닛은 선형주소의 상위 10비트를 페이지 디렉토리에서 페이지 테이블을 가리키는 주소로 해석합니다.
즉, 0001 0000 0000 0000 0000 0000 0000 0000에서 상위 비트 10비트는 0001 0000 00인데 이 값은 00 1000 0000 으로 0x80입니다.
2. 테이블 디렉토리의 0x80번째 엔트리가 가리키는 페이지 테이블에서 선형주소의 상위10비트 다음의 10비트 값을 해석합니다. 즉 중간 비트 10비트인 0x0에서 0x3f까지가 할당된 페이지입니다.
3. 마지막으로 0x406값은 오프셋 필드 값으로 할당된 페이지에서 0x406 오프셋에 있는 값을 가져오게 됩니다.
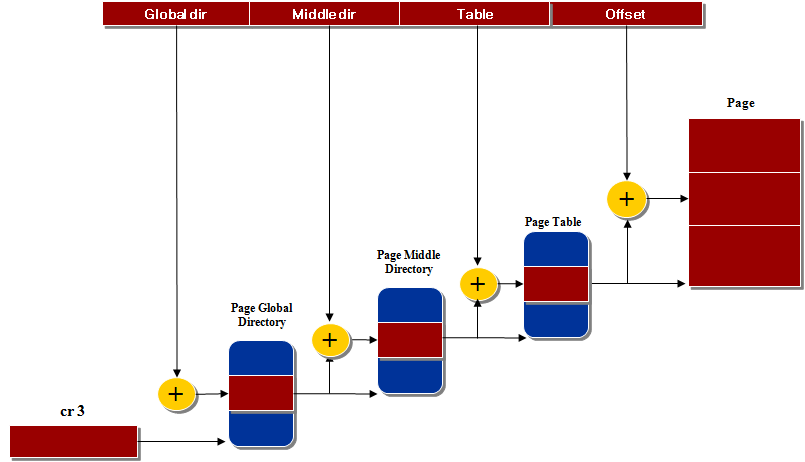
리눅스에서는 32비트와 64비트 아키텍처 양쪽 모두에 적합하도록 페이징을 3단계 걸쳐서 수행합니다.
(커널 2.6.11부터는 네 단계의 페이징 모델이 채택되었습니다)
[리눅스에서의 페이징]
일반적인 32비트 아키텍처에서는 페이지 중간 디렉토리 필드의 길이가 0비트라고 표시하고 페이지 상위 디렉토리 및 페이지 중간
디렉토리를 기본적으로 제거합니다. 하지만 포인터 연결 과정에서 페이지 상위 디렉토리와 페이지 중간 디렉토리의 위치는 그대로
남겨놓아서 동일한 코드로 32비트와 64비트 아키텍처 모두 정상적으로 동작하게 됩니다.
물리 주소 확장 기능이 활성된 32비트 아키텍처에서는 페이지 전역 디렉토리가 80x86의 페이지 디렉토리 포인터 테이블에
해당되며, 페이지 상위 디렉토리는 제거되고 리눅스의 중간 디렉토리는 80x86의 페이지 디렉토리에, 리눅스의 페이지 테이블은
80x86의 페이지 테이블에 해당하게됩니다.
64비트 아키텍처에서는 3 또는 4 단계의 페이징이 사용됩니다.
vim 에서 탭창 열기가 안되는줄 알았는데 되는군요.. 이제까지 vim 자체적으로 여러 파일여는게 불편해서 screen 등을 썼는데.. vim 창 상단에 탭창이 열리고 연 파일명이 보이는군요.. .. vim -p a.txt b.txt c.txt 하면 탭으로 열립니다. vim -p3 하면 이름없는 파일로 탭 3개가 열립니다.
연상태에서
:tabnew d.txt 하면 새탭으로 파일을 열고..
:tabn 은 앞쪽으로 탭창이동 :tabp 뒤탭으로 이동 :tabfirst 혹은 :tabfir 는 첫번째 탭창, :tablast 혹은 :tabla 는 마지막 탭창 .. .. 그런데 더 재밌는건.. 윈도우 gvim.exe 파일에서 --remote-tab-silent 하면 탐색기 등에서 파일을 열때마다 새창으로 gvim 이 뜨는게 아니라.. 하나의 gvim 창에서 탭창으로 열린다는거..
gvim.exe --remote-tab-silent aa.txt 로 파일을 연후에.. 다시 gvim.exe --remote-tab-silent bb.txt 로 명령을 내리면 새로 gvim 이 실행되는게 아니라.. 이전 aa.txt 열린 창에 탭창으로 열린다는점.. .. .. 신기.. .. 그런데 윈도우의 경우 연결프로그램 설정에서 gvim.exe "%1" 를 gvim.exe --remote-tab-silent "%1" 와 같이 해줘야 그 파일 클릭했을 경우 효과가 있음. .. 레지스트리 같은데서 해야 함. .. .. 윈도우 xp 에서 불여우 브라우저의 fireftp 부가기능으로 원격 서버 텍스트 웹소스 편집할때 연결을 위와 같은 식으로 하면.. 원격 소스를 열때마다 gvim 하나로 탭창으로 사용하니 편하군요.. ..
리눅스 커널 코드의 timer.c 에 사용되고 있는 Barrier 관련 부분이 잘 이해가 안갑니다.
코드 부분은 아래에 적었습니다.
/* * Accessing ->group_leader->real_parent is not SMP-safe, it could * change from under us. However, rather than getting any lock * we can use an optimistic algorithm: get the parent * pid, and go back and check that the parent is still * the same. If it has changed (which is extremely unlikely * indeed), we just try again.. * * NOTE! This depends on the fact that even if we _do_ * get an old value of "parent", we can happily dereference * the pointer (it was and remains a dereferencable kernel pointer * no matter what): we just can't necessarily trust the result * until we know that the parent pointer is valid. * * NOTE2: ->group_leader never changes from under us. */ asmlinkage long sys_getppid(void) { int pid; struct task_struct *me = current; struct task_struct *parent;
/* * Make sure we read the pid before re-reading the * parent pointer: */ smp_rmb(); parent = me->group_leader->real_parent; if (old != parent) continue; } #endif break; } return pid; }
위의 코드를 보게 되면 for 문 안의 pid = parent->tgid; 가 parent = me->group_leader->real_parent; 보다 나중에 실행될수 있기 때문에 smp_rmb() 를 걸어놓은것 같은데 어떤 상황에서 이런일이 발생할수 있는건가요 ? 제 생각에는 Compiler 가 최적화 과정을 통해서 for 문 안에 들어오기 전에 pid=parent->tgid 를 한번 실행하고 for 문 안에 들어오는 경우에는 위와 같은 case 가 발생할수 있기 때문이라는 생각이 들기는 하는데 좀 명확하지 않습니다.
여기 계신 전문가님들 께서 이 부분의 코드에 대해서 최대한 자세히 코멘트좀 달아주시길 부탁드립니다.
CPU의 execute queue(정확한 용어인지...-_-;;)에서 발생할 수 있기 때문에
이것을 사용하는 것이라고 알고 있습니다.
제가 테스트해본 경험에 의하면, 컴파일러의 경우 최적화가 아무리 높더라도,
코드내부에 asm과 같은 어셈블러 코드가 들어가면, 절대로 reordering을 하지 않았고,
reordering이 걱정되는 경우에는 강제로 dependency를 만들어서 코딩하는 경우도 있습니다.
코드에서
A struct task_struct *old = parent;
/* * Make sure we read the pid before re-reading the * parent pointer: */ B smp_rmb(); C parent = me->group_leader->real_parent; D if (old != parent) continue;
에서 A와 C의 순서를 강제로 보장하는 것인데,
만일 C->A의 순서대로 수행이 된다고 생각해 보십시요.
D의 수행결과가 엉망이 되겠지요.
왜 이런 코드가 생기는가는 A라인이 특성 때문입니다.
컴파일러 최적화는 논리적으로는 라인과 라인 물리적으로는 opcode block과 opcode block간의
dependency가 없고, reordering에 의해서 수행비용이 낮아질 수 있다면 무조건 순서를 바꿉니다.
혹은 CPU도 opcode간의 비용계산을 통해 수행순서를 바꾸지요.
애석하게도 위의 A는 C와 아무런 의존관계가 없기 때문에 이러한 현상이 나타날 수 있습니다.
사람의 생각으로는 이전의 parent값을 가져오는 논리적인 의존관계가 있지만,
컴파일러나 CPU입장에서는 단지 임시값을 저장하는 A의 코드를 의존관계를 보지 않지요.
물론, 사람은 D의 라인을 통해 이전의 값과 최신값을 비교하는 기능을 하고 싶은 것이지만,
컴파일러나 CPU는 그렇지 않다는데 문제가 있습니다.
사실 이런 문제를 코딩할 때 제대로 catch하기는 상당히 힘듭니다.
제가 몸담고 있는 회사의 경우에도 설계/구현시에는 아무런 문제가 없었다가,
IBM p690이라는 CPU 32개의 기계에서 memory barrier관련 문제가 발생하여서,
rmb, smp_rmb 모두 read memory barrier로, barrier위의 read가 끝난 뒤, barrier 아래의 read를 수행하라는 내용입니다.
두 read간의 순서가 어긋날 수 있는 것은 위의 김성진님이 말씀하신 것처럼, compiler의 optimization에
의해 일어날 수도 있고, cpu에서 최적화하는 과정에서 일어날 수도 있습니다. 물론 rmb 는 이 둘 모두를 막아주는 것이지요.
위의 내용은 맨 윗줄의 주석에 보니, real_parent라는 값 자체가 다른 cpu에 의해 변할 수 있는 값이라고
나오는군요. 따라서 정확한 값을 읽으려면 spinlock 을 사용하면 되겠지만, optimistic한 알고리즘을 써서 그냥 좀
비정확하더라도 spinlock overhead를 줄이겠다는 것이지요.
따라서 약간의 텀을 두고 real_parent를 두번 읽은 다음, 두번 사이에 변하지 않았다면 그게 맞는 거다 라고
생각하겠다 라는 것인듯 합니다. 그리고 그 두번의 텀을 주기 위해(라면 좀 이상할 수도 있겠지만. 여튼) real_parent의
pid를 먼저 읽고 그 뒤에 다시 real_parent를 읽겠다는 것입니다. 그리고 그 두 read간의 순서를 보장하기 위해
smp_rmb를 사용했다. 라고 생각하시면 될 듯 합니다.
컴파일러가 barrier 없이 만들 수 있는 최악의 코드는 temp = me->group_leader->real_parent; *old = parent; parent = temp; 이정도로 보입니다. barrier가 있다면 현재 소스 코드 형태로 코드가 생성되는 걸 보장할 수 있겠죠. 그래봐야 최악의 경우랑 비교해볼 때 old와 parent 값을 구하는 사이에 시간이 살짝 (인스트럭션 몇개 수행하는 시간 정도) 차이가 나니. 당연히 그사이에 값이 바뀔 확률이 높아 지는 건 맞는 것 같아보입니다. 아는 것만큼 보인다고 저게 뭔 효과가 명확하게 있나 모르겠네요. 고수님들 있고 없고의 차이와 성능에 대해 설명 좀 부탁드립니다. 그리고 #ifdef로 SMB와 PREEMPT가 있던데 왜 이 경우에 해당하는지도 설명해주시면 좋겠네요.
컴파일러가 더욱 바람직하지 않은 코드를 만들 수도 있습니다. 커널 소스의 경우 기본적으로 -O2 최적화가 이뤄지는데, 위
코드에서 smb_rmb() (내지는 barrier())가 없는 경우 컴파일러는 parent 변수의 값이 항상 동일할 것이라고
판단하여 "if defined(CONFIG_SMP) || defined(CONFIG_PREEMPT)" 내의 코드를 모두 생략해
버릴 수 있습니다. 타이밍 내지는 확률 정도의 문제가 아닌 게 되는 거죠. :-)
SMP와 PREEMPT의 의미는...
위 코드의 "if defined ..." 안에 있는 내용은 위 코드의 일부가 실행된 상태에서
me->group_leader->real_parent의 값을 바꿔버리는 다른 코드(가령, kernel/exit.c의
forget_original_parent())가 실행되는 경우에 발생할 수 있는 문제(반환되는 pid 값이 유효하지 않은 값이
되는 것)에 대처하기 위한 것입니다. 그런 경우는 크게 두 가지가 있습니다. 다른 코드가 이웃 CPU에서 동시에 실행되는
경우와, 실행 도중에 이 코드를 다른 코드가 선점하는 경우입니다. 각각 CONFIG_SMP와 CONFIG_PREEMPT에
대응하게 됩니다.
& 그나저나... 위 코드가 어느 버전의 코드인지는 모르겠지만, 최근 버전에서는 rcu를 이용해서 훨씬 단순하게 바뀌었나 보군요. ---- $PWD `date`
깔끔한 답변 감사합니다. 컴파일러 입장에서는 값이 바뀌는 경우가 없으니 for loop 밖에서 구한 me->goup_leader->real_parent의 값을 for loop안에서 그대로 이용하겠네요. 더 최적화한다면 똑같은 값을 parent에 넣는 거니 의미 없는 코드로 생각해 삭제해도 전혀 문제가 되지 않는 군요. 이런 건 정말 사람 눈에 보이지 않겠습니다. 컴파일러가 warning을 발생이라도 시켠 준단 몰라도 사람이 판단해기는 어렵겠네요. 코드에 워닝 나는 거 대충 생까주고 있는데, 낼부터 조심해서 봐야겠습니다.
A,B와 C와의 관계는 ANTI-depedency 관계에 있기 때문에 일반적인 방법으로 reorder 할수 없습니다. ANTI-dependency와 같은 false depedency는 register renameing과 같은 방법을 쓰면 reorder 할수 있습니다. 그리고 이때는 renaming 했기 때문에 reorder해도 아무 문제가 없기 때문에 질문하신분의 내용과는 크게 관계 없을듯 합니다.
때문에 굳이 smp_rmb()를 넣은 이유를 들라면 molla님께서 잘 설명해주셨듯이 spinlock을 동기화 해야 될 부분을 real_parent의 값을 두번읽어봄으로써 spinlock을 안쓰고 overheader 줄이려고 했고 이때 wariua님 말대로 이전에 읽은 parent를 보장하기 위해 smp_rmb()를 넣은 것입니다.
쓰신 내용에 제가 모르는 내용이 많아서 몇가지 검색하면서 새로운 것들 많이 배웠습니다. Processor Reordering이 뭔지 어떻게 되나 알수가 없었는데, Out-of-Order Processor라는 게 있더군요. 인스트럭션을 큐에다 집어넣고, 인스트럭션의 operand가 가용할 때까지 기다렸다고 수행해서 메모리에서 로드될 때까지 기다리는 시간을 줄이는 방법이더군요. 상세히는 모르겟지만 대충 감은 잡히더군요.
그런데 이런 의문이 들더군요. 고수님들은 Processor의 이런 기능까지 고려해서 코드를 작성합니까? 어셈블러가 아닌 C 언어에서도 이 기능들을 이용한 최적화가 가능합니까? 저로서는 도저히 감이 안 잡힙니다. 혹 이런 원칙이 있으면 알려주세요.
적다 보니 살짝 한심한 생각이 드네요. N^2이니 NlogN 같은 루프 수행 회수나 확실히 줄이고, 그 다음에 몇 clock 줄이는 방법 고민해야지. 걷지도 못하는 주제에 뛸려고 하는 것 같습니다. 그래도 요런게 신기하고 또 재미는 있네요. 이런 놈들 때문에 클럭 단위의 수행 시간 계산은 거의 불가능하네요. cache hit에다가 instruction도 순서대로 수행 안 될 수도 있으니.. 참 복잡하고 경이로운 세상입니다. 엔지니어링의 마지막은 최적화인가 봅니다. 수많은 패러미터들 위에서 최적 방법을 찾는 건 정말 Art입니다.
일반적으로 application을 개발할때는 고려하지 않습니다. 사실 이런류의 architecture 최적화는 들이는 노력에 비해 얻는것이 크지 않기 때문입니다. 그 보다는 알고리즘 level 또는 자료구조를 잘 설계하기 위해 노력합니다.
하지만 OS, compiler와 같은 system level 프로그래밍을 하거나 codec과 같은 성능에 민감한 프로그래밍을 할때는 고려를 합니다.
compiler의 경우 compiler 자체 source code에서는 고려하지 않고 compiler가 생성하는 code에 대해서는 모두 이런 특징을 고려하고 있습니다.
OS와 같은 경우에는 linux kernel source에서 보신봐와 같이 c level에서 어떻게 assembly
code가 생성될지... 그리고 그 assembly code가 architecture 특징에 따라 어떻게 scheduling
될지에 따라 최적화 되고 안되고의 문제를 떠나 정상적으로 수행될지 안될지의 문제가 생기기 때문에 항상 c 소스를 코딩하면서
머리속으로 컴파일 하고 scheduling 하면서 코딩을 합니다. 그렇지 않으면 이런류의 오류는 쉽게 발견되기도 힘들고 큰
사고로 연결될수 있기 때문입니다. 그리고 c level에서 이렇게 생각할수 있는건 어느 정도의 compiler 지식과, architecture 지식을 가지고 습관적으로 연습하면 어렵지 않게 할수 있습니다.
codec 같은 경우에는 이정도까지 고려는 하지 않고 SIMD와 DMA 쓰는것 정도로 고려를 하는것 같습니다. codec
하시는 분들은 대부분 architecture나 compiler에 대해서는 깊게 모르시더군요. 하지만 워낙 성능에 민감한
프로그램이라서 architecture에서 제공해주는 최적화 기능들을 사용하려고 노력하는것 같았습니다.
결국 일반적인 application을 작성할때는 고려를 하면 좋지만 굳이 그럴필요까지는 없다고 생각합니다.
processor나 compiler에 맞겨버리면 되는 문제라는 생각이 듭니다. 하지만 처음부터 고려를 하는것이 목적인 프로그램을
작성하시거나, 고려하지 않으면 문제가 발생할수 있는 프로그래밍을 하실때는 그때는 심각하게 고려를 해야겠지요.
그 두 parent 포인터가 변하지 않았다면 처음 두 statement를 실행하는 동안 real_parent가 변하지 않았다는 것을 입증할 수 있습니다.
그러나 instruction reordering에 의해 pid구하기가 두 번의 parent 포인터 구하기 사이에 실행되지 않고 그 후에 실행된다면 real_parent가 변하지 않았다는 것을 입증할 수 없습니다. 이를 방지하기 위해 memory barrier를 사용한 것으로 보입니다.
/*************************************** Being the one is just like being in love. ***************************************/
-r : 옵션은 Rock Ridge 프로토콜을 이용하여 이미지를 만들고, uid나 gid를 0으로 설정합니다. 왜냐하면 시디에는 사용자나 그룹 권한이 필요없기 때문이죠. -J : iso9660 파일 이름에 Joliet 파일 이름을 추가로 만듭니다. win95/NT에서 호환되기 위함입니다. -l -L : 이것은 리눅스에서 '.'가 여러개 들어가는 파일 이름을 윈도우즈 환경에서도 인식시키기 위한 옵션입니다. 이 옵션이 빠지면 리눅스의 redhat-6.2.rpm 이라는 파일 이름이 윈도우즈에서는 redhat-6.2 라고 읽힙니다. -T : Rock Ridge 프로토콜과 호환되지 않는 시스템을 위해서 시디에 TRANS.TBL 이라는 파일을 만들어 호환성을 유지합니다. -V "이름" : 시디의 이름입니다. -o 파일명 : 만들어진 시디이미지의 파일 이름입니다. 경로 : 시디이미지로 구울 파일들을 써주시면 됩니다.
이렇게 명령을 내리면 진척사항을 퍼센트로 보여주면서 만듭니다. 또한 시디이미지를 만들때 파일명이 #으로 시작하거나 ~로 끝나는 파일들은 백업 파일로 인식하여 자동으로 빼고 만듭니다. 시디이미지가 완성이 되면 확인을 해야겠지요. 일반 시디와 마찬가지로 마운트하여 확인을 할 수 있습니다.
mount cdimg.iso -r -t iso9660 -o loop /mnt
-r : 읽기만 허용해서 (시디 이니 당연하겠죠) -t iso9660 : 파일 형식은 iso9660 -o loop : loop back 장치를 이용해서 /mnt 디렉토리에 마운트를 합니다.
이 방법으로 중요 파일들을 백업해놓고 보관했다가 필요시에 사용하거나 시디로 구울 수 있어 편리합니다. 또한 부팅 이미지가 있다면 부트 시디이미지를 만들 수 있습니다. -b 부팅 이미지 만 추가하면 됩니다.


memory barrier는 execution
memory barrier는 execution ordering을 보장하기 위한 것이지요.
execution reordering은 컴파일러 최적화에 의해서 일어날 수 도 있고,
CPU의 execute queue(정확한 용어인지...-_-;;)에서 발생할 수 있기 때문에
이것을 사용하는 것이라고 알고 있습니다.
제가 테스트해본 경험에 의하면, 컴파일러의 경우 최적화가 아무리 높더라도,
코드내부에 asm과 같은 어셈블러 코드가 들어가면, 절대로 reordering을 하지 않았고,
reordering이 걱정되는 경우에는 강제로 dependency를 만들어서 코딩하는 경우도 있습니다.
코드에서
A struct task_struct *old = parent;
/*
* Make sure we read the pid before re-reading the
* parent pointer:
*/
B smp_rmb();
C parent = me->group_leader->real_parent;
D if (old != parent)
continue;
에서 A와 C의 순서를 강제로 보장하는 것인데,
만일 C->A의 순서대로 수행이 된다고 생각해 보십시요.
D의 수행결과가 엉망이 되겠지요.
왜 이런 코드가 생기는가는 A라인이 특성 때문입니다.
컴파일러 최적화는 논리적으로는 라인과 라인 물리적으로는 opcode block과 opcode block간의
dependency가 없고, reordering에 의해서 수행비용이 낮아질 수 있다면 무조건 순서를 바꿉니다.
혹은 CPU도 opcode간의 비용계산을 통해 수행순서를 바꾸지요.
애석하게도 위의 A는 C와 아무런 의존관계가 없기 때문에 이러한 현상이 나타날 수 있습니다.
사람의 생각으로는 이전의 parent값을 가져오는 논리적인 의존관계가 있지만,
컴파일러나 CPU입장에서는 단지 임시값을 저장하는 A의 코드를 의존관계를 보지 않지요.
물론, 사람은 D의 라인을 통해 이전의 값과 최신값을 비교하는 기능을 하고 싶은 것이지만,
컴파일러나 CPU는 그렇지 않다는데 문제가 있습니다.
사실 이런 문제를 코딩할 때 제대로 catch하기는 상당히 힘듭니다.
제가 몸담고 있는 회사의 경우에도 설계/구현시에는 아무런 문제가 없었다가,
IBM p690이라는 CPU 32개의 기계에서 memory barrier관련 문제가 발생하여서,
상당히 혼난적이 있습니다.
경험으로는 위의 코드는 강제로 depencency를 주어서 해결하기도 하였지만,
100% 보장은 못하겠습니다.
int a = 0;
if (a++ == 0)
{
execution A;
}
if (a++ == 1)
{
execution B;
}
이렇게 해결한 적도 있습니다만..쩝.
김성진
고도의 추상화, 극도의 구체화, 에디슨을 그리워하다.
그런데 코멘트를 보게 되면
설명 감사드립니다.
그런데 코드 안의 아래 코멘트를 참조하면
Make sure we read the pid before re-reading the parent pointer
old 보다는 pid 를 읽는게 실질적인 이유인것 같은데 어떻게 생각하시는지요 ?
rmb 는 read간의 순서를 맞춰주기 위한 barrier 입니다.
rmb, smp_rmb 모두 read memory barrier로, barrier위의 read가 끝난 뒤, barrier 아래의 read를 수행하라는 내용입니다.
두 read간의 순서가 어긋날 수 있는 것은 위의 김성진님이 말씀하신 것처럼, compiler의 optimization에 의해 일어날 수도 있고, cpu에서 최적화하는 과정에서 일어날 수도 있습니다. 물론 rmb 는 이 둘 모두를 막아주는 것이지요.
위의 내용은 맨 윗줄의 주석에 보니, real_parent라는 값 자체가 다른 cpu에 의해 변할 수 있는 값이라고 나오는군요. 따라서 정확한 값을 읽으려면 spinlock 을 사용하면 되겠지만, optimistic한 알고리즘을 써서 그냥 좀 비정확하더라도 spinlock overhead를 줄이겠다는 것이지요.
따라서 약간의 텀을 두고 real_parent를 두번 읽은 다음, 두번 사이에 변하지 않았다면 그게 맞는 거다 라고 생각하겠다 라는 것인듯 합니다. 그리고 그 두번의 텀을 주기 위해(라면 좀 이상할 수도 있겠지만. 여튼) real_parent의 pid를 먼저 읽고 그 뒤에 다시 real_parent를 읽겠다는 것입니다. 그리고 그 두 read간의 순서를 보장하기 위해 smp_rmb를 사용했다. 라고 생각하시면 될 듯 합니다.
이 코드의 효과를 잘 모르겠네요.
컴파일러가 barrier 없이 만들 수 있는 최악의 코드는
temp = me->group_leader->real_parent;
*old = parent;
parent = temp;
이정도로 보입니다.
barrier가 있다면 현재 소스 코드 형태로 코드가 생성되는 걸 보장할 수 있겠죠.
그래봐야 최악의 경우랑 비교해볼 때 old와 parent 값을 구하는 사이에 시간이 살짝 (인스트럭션 몇개 수행하는 시간 정도) 차이가 나니. 당연히 그사이에 값이 바뀔 확률이 높아 지는 건 맞는 것 같아보입니다.
아는 것만큼 보인다고 저게 뭔 효과가 명확하게 있나 모르겠네요.
고수님들 있고 없고의 차이와 성능에 대해 설명 좀 부탁드립니다.
그리고 #ifdef로 SMB와 PREEMPT가 있던데 왜 이 경우에 해당하는지도 설명해주시면 좋겠네요.
커널 소스는 참 어렵네요.
컴파일러가 더욱
컴파일러가 더욱 바람직하지 않은 코드를 만들 수도 있습니다. 커널 소스의 경우 기본적으로 -O2 최적화가 이뤄지는데, 위 코드에서 smb_rmb() (내지는 barrier())가 없는 경우 컴파일러는 parent 변수의 값이 항상 동일할 것이라고 판단하여 "if defined(CONFIG_SMP) || defined(CONFIG_PREEMPT)" 내의 코드를 모두 생략해 버릴 수 있습니다. 타이밍 내지는 확률 정도의 문제가 아닌 게 되는 거죠. :-)
SMP와 PREEMPT의 의미는...
위 코드의 "if defined ..." 안에 있는 내용은 위 코드의 일부가 실행된 상태에서 me->group_leader->real_parent의 값을 바꿔버리는 다른 코드(가령, kernel/exit.c의 forget_original_parent())가 실행되는 경우에 발생할 수 있는 문제(반환되는 pid 값이 유효하지 않은 값이 되는 것)에 대처하기 위한 것입니다. 그런 경우는 크게 두 가지가 있습니다. 다른 코드가 이웃 CPU에서 동시에 실행되는 경우와, 실행 도중에 이 코드를 다른 코드가 선점하는 경우입니다. 각각 CONFIG_SMP와 CONFIG_PREEMPT에 대응하게 됩니다.
& 그나저나... 위 코드가 어느 버전의 코드인지는 모르겠지만, 최근 버전에서는 rcu를 이용해서 훨씬 단순하게 바뀌었나 보군요.
----
$PWD `date`
깔끔한 답변
깔끔한 답변 감사합니다.
컴파일러 입장에서는 값이 바뀌는 경우가 없으니 for loop 밖에서 구한 me->goup_leader->real_parent의 값을 for loop안에서 그대로 이용하겠네요.
더 최적화한다면 똑같은 값을 parent에 넣는 거니 의미 없는 코드로 생각해 삭제해도 전혀 문제가 되지 않는 군요.
이런 건 정말 사람 눈에 보이지 않겠습니다.
컴파일러가 warning을 발생이라도 시켠 준단 몰라도 사람이 판단해기는 어렵겠네요.
코드에 워닝 나는 거 대충 생까주고 있는데, 낼부터 조심해서 봐야겠습니다.
아무리 compiler가 ILP
아무리 compiler가 ILP 최적화를 수행하고, processor에서 reorder 한다고 해도 위코드는 말씀하신대로 reorder 되지는 않습니다.
===========================================
A: pid = temp;
B: old = temp;
C: temp = me->group_leader->real_parent;
===========================================
A,B와 C와의 관계는 ANTI-depedency 관계에 있기 때문에 일반적인 방법으로 reorder 할수 없습니다.
ANTI-dependency와 같은 false depedency는 register renameing과 같은 방법을 쓰면 reorder 할수 있습니다.
그리고 이때는 renaming 했기 때문에 reorder해도 아무 문제가 없기 때문에 질문하신분의 내용과는 크게 관계 없을듯 합니다.
때문에 굳이 smp_rmb()를 넣은 이유를 들라면 molla님께서 잘 설명해주셨듯이
spinlock을 동기화 해야 될 부분을 real_parent의 값을 두번읽어봄으로써 spinlock을
안쓰고 overheader 줄이려고 했고 이때 wariua님 말대로 이전에 읽은 parent를 보장하기 위해
smp_rmb()를 넣은 것입니다.
쓰신 내용에 제가
쓰신 내용에 제가 모르는 내용이 많아서 몇가지 검색하면서 새로운 것들 많이 배웠습니다.
Processor Reordering이 뭔지 어떻게 되나 알수가 없었는데, Out-of-Order Processor라는 게 있더군요.
인스트럭션을 큐에다 집어넣고, 인스트럭션의 operand가 가용할 때까지 기다렸다고 수행해서 메모리에서 로드될 때까지 기다리는 시간을 줄이는 방법이더군요.
상세히는 모르겟지만 대충 감은 잡히더군요.
그런데 이런 의문이 들더군요.
고수님들은 Processor의 이런 기능까지 고려해서 코드를 작성합니까?
어셈블러가 아닌 C 언어에서도 이 기능들을 이용한 최적화가 가능합니까?
저로서는 도저히 감이 안 잡힙니다. 혹 이런 원칙이 있으면 알려주세요.
적다 보니 살짝 한심한 생각이 드네요.
N^2이니 NlogN 같은 루프 수행 회수나 확실히 줄이고, 그 다음에 몇 clock 줄이는 방법 고민해야지.
걷지도 못하는 주제에 뛸려고 하는 것 같습니다.
그래도 요런게 신기하고 또 재미는 있네요.
이런 놈들 때문에 클럭 단위의 수행 시간 계산은 거의 불가능하네요.
cache hit에다가 instruction도 순서대로 수행 안 될 수도 있으니.. 참 복잡하고 경이로운 세상입니다.
엔지니어링의 마지막은 최적화인가 봅니다.
수많은 패러미터들 위에서 최적 방법을 찾는 건 정말 Art입니다.
일반적으로
일반적으로 application을 개발할때는 고려하지 않습니다.
사실 이런류의 architecture 최적화는 들이는 노력에 비해 얻는것이 크지 않기 때문입니다.
그 보다는 알고리즘 level 또는 자료구조를 잘 설계하기 위해 노력합니다.
하지만 OS, compiler와 같은 system level 프로그래밍을 하거나 codec과 같은 성능에 민감한 프로그래밍을 할때는 고려를 합니다.
compiler의 경우 compiler 자체 source code에서는 고려하지 않고 compiler가 생성하는 code에 대해서는 모두 이런 특징을 고려하고 있습니다.
OS와 같은 경우에는 linux kernel source에서 보신봐와 같이 c level에서 어떻게 assembly code가 생성될지... 그리고 그 assembly code가 architecture 특징에 따라 어떻게 scheduling 될지에 따라 최적화 되고 안되고의 문제를 떠나 정상적으로 수행될지 안될지의 문제가 생기기 때문에 항상 c 소스를 코딩하면서 머리속으로 컴파일 하고 scheduling 하면서 코딩을 합니다. 그렇지 않으면 이런류의 오류는 쉽게 발견되기도 힘들고 큰 사고로 연결될수 있기 때문입니다.
그리고 c level에서 이렇게 생각할수 있는건 어느 정도의 compiler 지식과, architecture 지식을 가지고 습관적으로 연습하면 어렵지 않게 할수 있습니다.
codec 같은 경우에는 이정도까지 고려는 하지 않고 SIMD와 DMA 쓰는것 정도로 고려를 하는것 같습니다. codec 하시는 분들은 대부분 architecture나 compiler에 대해서는 깊게 모르시더군요. 하지만 워낙 성능에 민감한 프로그램이라서 architecture에서 제공해주는 최적화 기능들을 사용하려고 노력하는것 같았습니다.
결국 일반적인 application을 작성할때는 고려를 하면 좋지만 굳이 그럴필요까지는 없다고 생각합니다. processor나 compiler에 맞겨버리면 되는 문제라는 생각이 듭니다. 하지만 처음부터 고려를 하는것이 목적인 프로그램을 작성하시거나, 고려하지 않으면 문제가 발생할수 있는 프로그래밍을 하실때는 그때는 심각하게 고려를 해야겠지요.
parent구하기와 pid구하기를 atomic하게 실행할 수 없기 때문
아래 두 statement를 atomic하게 실행할 수 없기 때문이라고 봅니다.
parent = me->group_leader->real_parent;
pid = parent->tgid;
위의 두 statement를 실행하는 동안 real_parent가 바뀔 수도 있고 결과적으로 parent의 pid도 바뀔 수 있습니다(SMP, preemptive환경에서).
이를 막기 위해 두 statement의 앞뒤로 lock 쓸 수 있으나 그럴 경우 성능이 떨어지기 때문에 안쓴겁니다.
대신에 아래와 같이 parent 포인터 구하기를 두 번 실행하고
parent = me->group_leader->real_parent;
pid = parent->tgid;
parent = me->group_leader->real_parent;
그 두 parent 포인터가 변하지 않았다면 처음 두 statement를 실행하는 동안 real_parent가 변하지 않았다는 것을 입증할 수 있습니다.
그러나 instruction reordering에 의해 pid구하기가 두 번의 parent 포인터 구하기 사이에 실행되지 않고 그 후에 실행된다면 real_parent가 변하지 않았다는 것을 입증할 수 없습니다.
이를 방지하기 위해 memory barrier를 사용한 것으로 보입니다.
/***************************************
Being the one is just like being in love.
***************************************/